CONFIGURATION GUIDE
The purpose of the following manual is to describe the necessary configuration of Cisco Meraki for integration with Octopus Platform.
| Panel | ||||||||||||
|---|---|---|---|---|---|---|---|---|---|---|---|---|
| ||||||||||||
|
1- Pre-requisites
If there is a firewall in the network that might block the traffic, you will need to allow access to some domains to enable user's authentication:
Radius Servers:
Primary: <IP_Radius_1> 1812 and 1813 UDP ports
Secondary: <IP_Radius_2> 1812 and 1813 UDP ports
Splash Portal server:
Domain <captive_portal_domain> 80 and 443 TCP ports
For the operation of the Guest and Enterprise modules configuration, it will be necessary to previously contract the Octopus platform licenses with the respective modules.
2- Guest module configuration
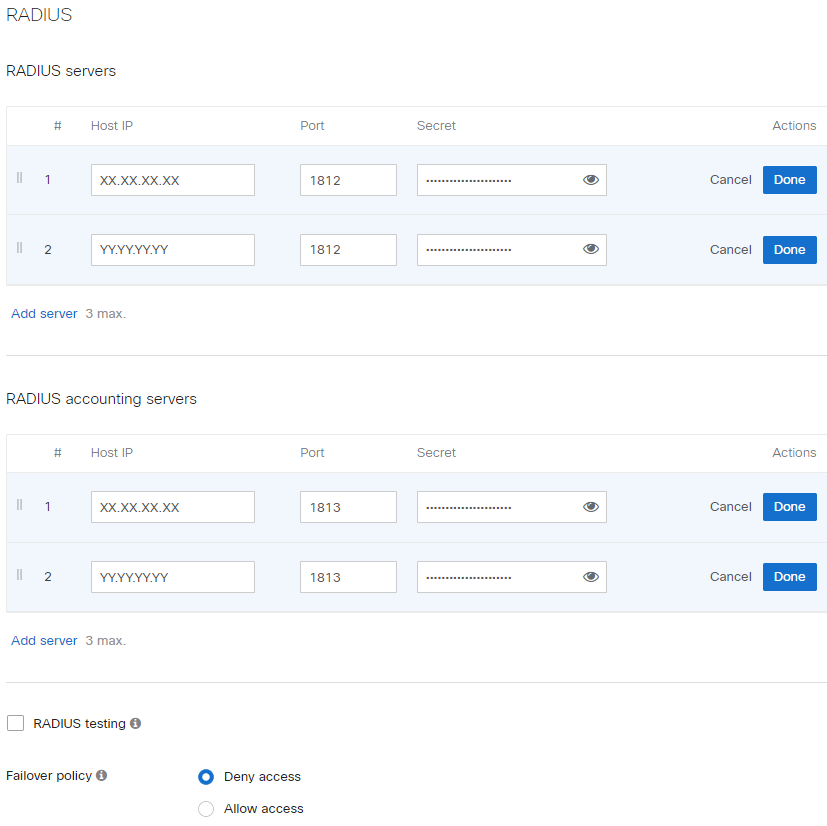
2.1 Radius Servers
To configure the Radius Server which the user's authentication requests will be sent to, set up the following parameters in Wirelless > Configure > Access Control:
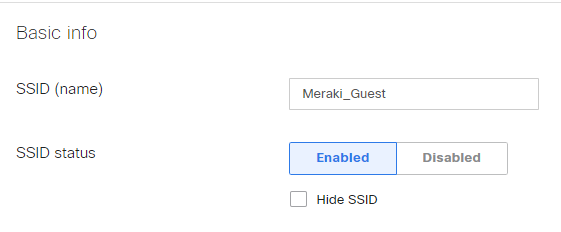
SSID (name): Set up the SSID name that will be visible to the wireless users. Must be the same as the one configured in Otopus Platform
SSID status: Enabled
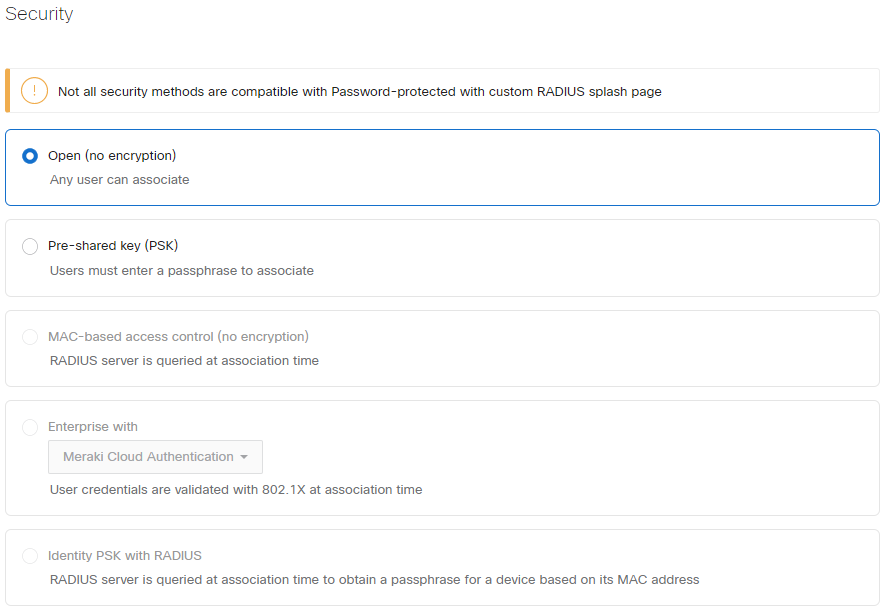
Association requirements: Open (no encryption)
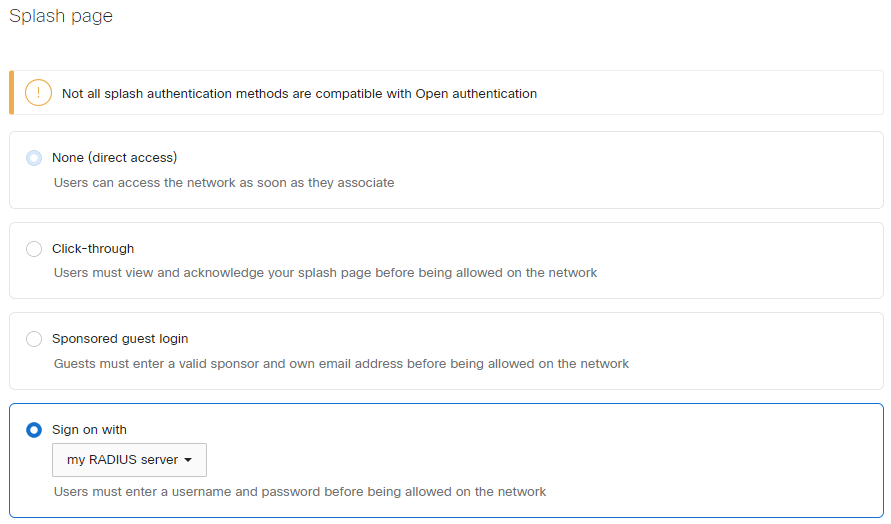
Splash page: Sign-on with my RADIUS server
RADIUS servers: add new Radius Server with the following parameters:
Host: <IP_Radius_1>
Auth port: 1812
Secret: <Secret>
Host: <IP_Radius_2>
Auth port: 1812
Secret: <Secret>
RADIUS accounting: RADIUS accounting is enabled
RADIUS accounting servers: add new Radius Server with the following parameters:
Host: <IP_Radius_1>
Port: 1813
Secret: <Secret>
Host: <IP_Radius_2>
Port: 1813
Secret: <Secret>
Failover policy: Deny access
| Info |
|---|
If the option to add an Accounting Radius Server is not enable, it will be necessary to open a support case with Meraki. In order to send the request to Meraki support access to Help > Cases > New Case and add a brief description of the problem. E.g. "Please could you enable Radius Accounting setting for this site?" |
2.2 Captive portal
In order to configure the external captive portal, it is necessary to access to Wireless > Configure > Splash page and select the SSID is necessary to edit:
Custom splash URL: https://<captive_portal_domain>/login/hotspot/meraki/SSID
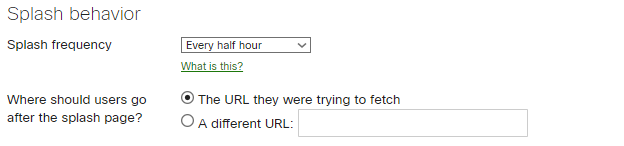
Splash behavior
Splash frequency: Every half hour
Where should users go after splash page?: The URL they were trying to fetch. This configuration allows you to set up in the WIFI platform the URL which the users will be redirected to:


| Info |
|---|
Change the SSID parameter in the above URL to the name of the SSID that will be radiated by the APs. Example: <https://<captive_portal_domain>/login/hotspot/meraki/WIFI_GUEST> |
After having accomplished these changes, please click on Save Changes to apply this configuration.
2.3 Walled Garden
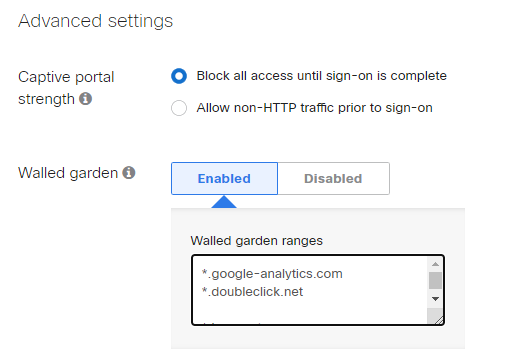
In order to configure the domains that the users will be able to visit without being authenticated in the captive portal, it is necessary to configure the following parameters in the Access Control section > Advanced Settings
Captive portal strenght: Block all access until sign-on is complete
Walled garden: Enabled
Walled garden ranges: Add the domains that the users will be able to visit before login.
| Info |
|---|
If you wish to add extra domains (Social Networks, Paypal, etc...) they can be consulted from the following link. |
| Info |
|---|
If the option to add the domains to the Walled Garden is not enable, it will be necessary to open a support case with Meraki. In order to send the request to Meraki support access to Help > Cases > New Case and add a brief description of the problem. E.g. "Please could you enable domain based walled garden support?" |
2.4 Authorized MAC Addresses
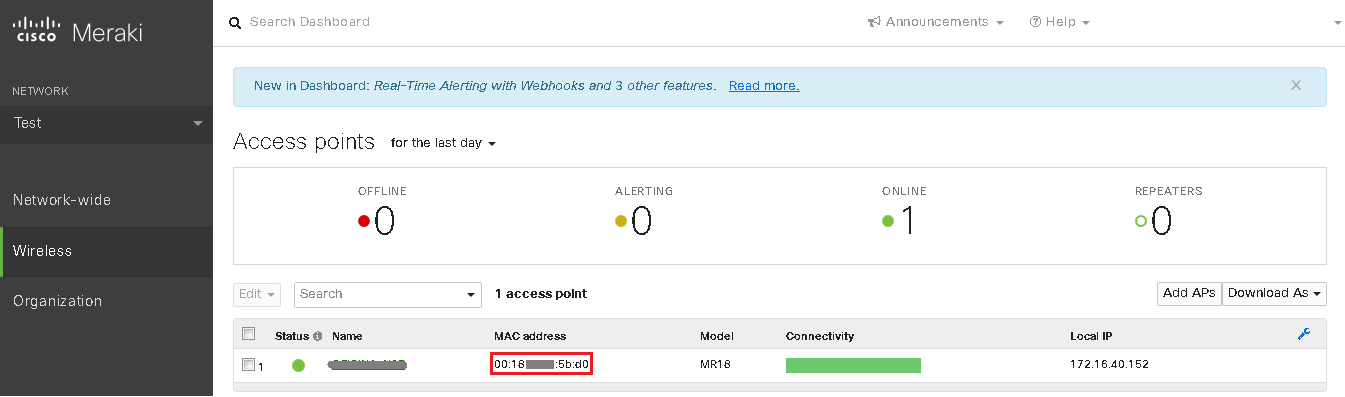
For user validation to work correctly, it is necessary to identify the NAS that will be able to make authentication requests to the Radius Server. In this case, all the MAC addresses of the Access Points that will radiate the configured SSID must be added.
These MAC addresses can be obtained in the Meraki Dashboard accessing to Wireless > Monitor > Access Points.
| Info |
|---|
For information on how to add the MAC address of each AP as an authorized NAS on the platform, please refer to the following link Locations |
3- Enterprise module configuration
In order to integrate the configurations of this module with the platform, it is necessary to contract the Octopus Wifi Enterprise Module.
3.1 MAC Caching
Cisco Meraki does not support MAC authentication with redirection to a captive portal if the authentication fails.
3.2 Configuration of “Access Profiles” funtionality in the Octopus Platform
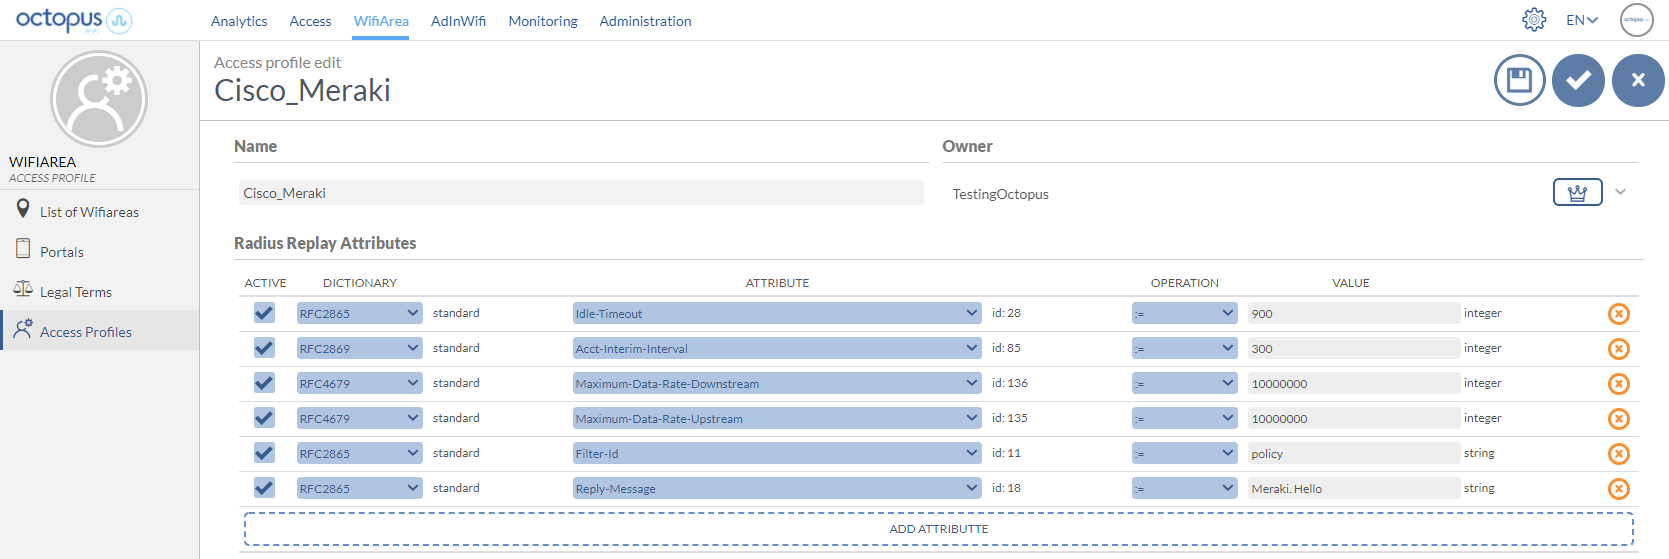
Through the Octopus platform it is possible to configure a series of reply attributes of the Access-Accept packets, grouped in the so-called Access Profile. These Access Profiles allow to activate a series of functionalities in the Cisco. Although the most common and proprietary Cisco radius dictionaries are available, the following is a list of some of the most interesting ones:
Attribute | Description | Format |
|---|---|---|
Idle-Timeout | Maximum idle time. If the user does not transfer any data on the network during this time, the session will be terminated and the user will have to re-authenticate. | seconds |
Acct-Interim-Interval | Defines the time interval in which the NAS sends the accounting packet update with all the user's session information. | seconds (300 Seconds minimum) |
Maximum-Data-Rate-Downstream | Define downstream speed limits for a given session. | Bytes |
Maximum-Data-Rate-Upstream | Define upload speed limits for a given session. | Bytes |
Filter-ID | Assign a policy to the user. Policy in which traffic and QoS policies can be configured. | |
Reply-Message | Useful for troubleshooting functions, since it allows to identify associated elements of the Octopus platform, such as an access profile, access method, location, ... |
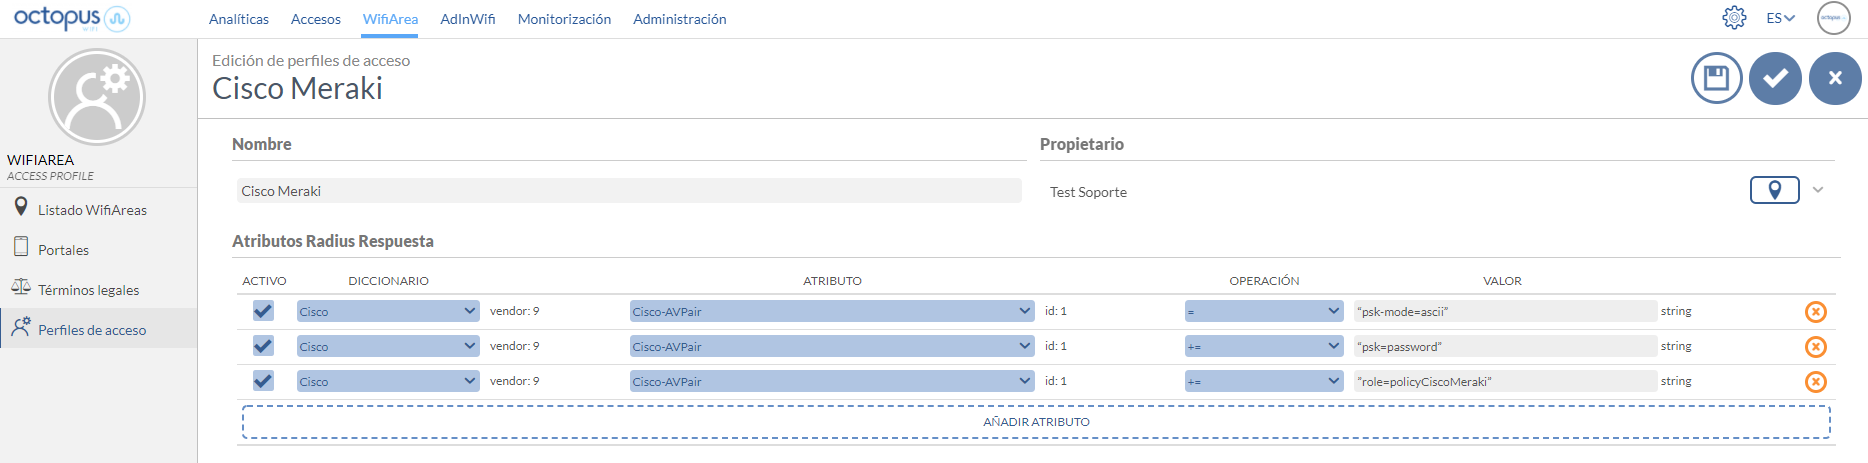
Example of an Access Profile configuration with the attributes explained above:
| Info |
|---|
For more information on how to create an Access Profile in Octopus Platform go to /wiki/spaces/SOP/pages/1963492399 Access profiles |
3.3 Identity PSK Configuration
Some devices that connect to our networks, especially IoT devices, do not have the ability to make connections through secure validations such as 802.1X and therefore connect through WPA-PSK validations. This type of validation has security drawbacks since the key is unique and any device can connect. Cisco's Identity PSK functionality allows two-factor authentication through MAC filtering and PSK keys, which can be assigned per device or device groups, enabling large-scale security and control. To configure Identity PSK:
Cisco Meraki Configuration
Access the Access control section to configure the SSID
Network access: Identity PSK with RADIUS
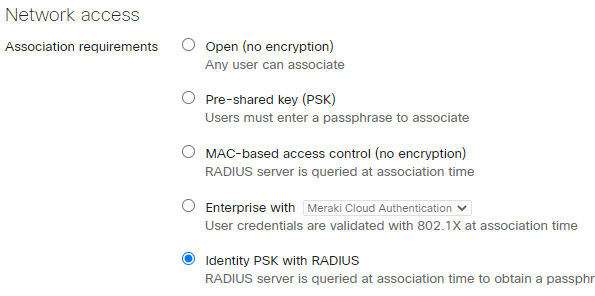
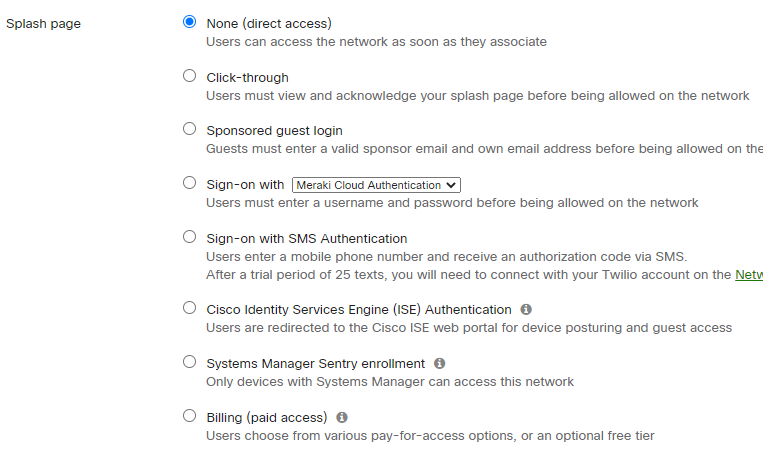
Splash page: None (direct access)
RADIUS servers:
Server 1: Configured in point 2.1 of the manual.
Server 2: Configured in point 2.1 of the manual.
Radius accounting: Radius accounting is enabled
Radius accounting servers
Server 1: Configured in point 2.1 of the manual.
Server 2: Configured in point 2.1 of the manual.


Octopus platform configuration > Access Profile
Radius attributes to configure:
cisco-av-pair = “psk-mode=ascii”
cisco-av-pair += “psk=password”
Possible to combine with local policy with the attribute
cisco-av-pair +=´´role=policyCiscoMeraki``